|
|
|
|
|
|
|
TABLE OF CONTENTS HISTORY THE TIMELINE MANUFACTURER'S HISTORIES THE PATENT PAGES THE PRE-ELECTRIC ERA VINTAGE ADVERTISING THE LIGHT SET GALLERIES RELATED LINKS FREQUENTLY ASKED QUESTIONS Since the first version of
this site went online on September 7, 2000, I've
received hundreds of wonderful questions about vintage lighting outfits
and other
electrical Christmas decorations. This page will feature some of the
most often asked of
these questions, along with my answers, in the hopes of sharing as much
information as possible to everyone.
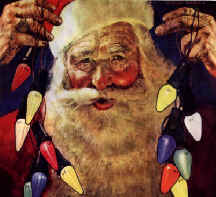
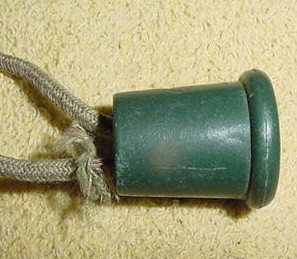
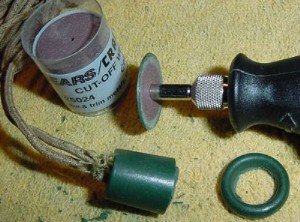
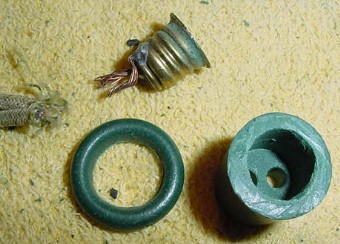
HOW MUCH IS MY OLD LIGHTING OUTFIT WORTH? By far the most frequently asked question, I'm more than happy to help you value your light sets, but I MUST have several good ways to find out current selling prices are by checking the Internet auction site eBay and by visiting the wonderful Kovels' Online Antiques And Collectibles Price Guide website. WHERE CAN I GET HARD TO FIND PARTS AND LIGHT BULBS? The best place to look for genuine, vintage Christmas items is on eBay, the Internet auction site. Their address is: (www.ebay.com). Browse the Holiday categories for the item you're looking for and you will be amazed at what comes up. If you are not familiar with eBay, they have a great tutorial section on their site as well. If you are looking for replacement lights and bubble lamps that are modern reproductions of the originals, try contacting Paul at (lionsden1@aol.com). He can hook you up with reproductions of lots of hard to find electrical Christmas items. IS IT SAFE TO ACTUALLY USE MY OLD LIGHTS FOR DECORATING? As long as your wiring is soft and flexible, and there is no fraying or exposed wires, your set is safe to use. If you are using the older lamps on an artificial tree, use caution as the heat generated could melt plasticized needles. Modern lamps are of the cool burning type, and therefore do not present a problem. But the vintage lamps (any made before 1970 or so) burn much hotter and therefore must be used with caution. See the answer to the next question below for additional information. I LOVE MY OLD BUBBLE LIGHTS AND WANT TO USE THEM, BUT I'M AFRAID THEY MAY BURN OUT. IS THERE ANY WAY TO MAKE THEM LAST LONGER? The best way to safely burn all of your vintage Christmas lights, including bubble lights, is to use a table lamp dimmer with them. The dimmers are available at many stores such as The Home Depot, Wal-Mart and K-Mart, and are surprisingly inexpensive. The dimmers are self contained units, made to sit on an end table, and have a convenient slide control. Simply plug your light sets into the dimmer unit, and set the brightness at about 80% of full. Your bubble lights will still boil merrily away, and all of your lights will burn much cooler. Running lamps at this level will extend their lives by at least three times, and most often longer than that. In my ten years or so of collecting, I have not had a single lamp failure on any of the sets that I run off a dimmer. IS IT POSSIBLE TO FIX MY OLD BAKELITE SOCKETED LIGHTING STRINGS SO THEY CAN BE USED AGAIN? As long as your wiring sets are not severely frayed and have not become brittle and stiff with age, in many cases it is possible to repair them and put the strings back into service again. Here are some great tips for fixing those old series wired C-6 type lighting strings that may be in your collection gathering dust because of a bad socket or loose wire. They have been kindly shared with us by Lee Lowry and Chris Cuff: In the majority of cases, the inner brass socket of the C-6 type strings can easily be separated from its Bakelite shell by a gentle push through the back of the shell with a dull flat bladed screwdriver. Once the socket is free, it will be easy to resolder the wires to their proper places, or cut back a frayed area and reconnect it. Chris suggests that it is a good idea to use a little bit of shrink tubing abound the new connections to prevent shorts and extend the life of the assembly. You can get the tubing at Radio Shack, and it can be easily cut to length with a pair of scissors. It is a good idea to keep a supply of extra sockets and bakelite shells handy for these repairs. Chris also suggests that if the center terminal of your socket is not repairable, it can be replaced with a 5-56 round head machine screw, cut close and soldered on the proper side. Lee gives us a way to repair the more difficult larger candelabra and intermediate sockets (C-7 and C-9). It is not as simple as the C-6, but his method is effective. C-7 and C-9 strings are often filled with pitch at the factory. It was used as a waterproofing agent and stabilizer treatment. Lee used to try to dig out the pitch, but it was time consuming and often split the shell. What He suggests now is to cut off the sockets from the wiring harness right at the base and stand a group of them upright in an aluminum pie dish. Put them carefully in a toaster or regular oven set at about 250° for a half-hour or so, long enough to melt the pitch, which runs out the bottoms of the sockets. Once all the pitch is melted and has flowed out, remove the pan and drive out the sockets the same way as the C6. It is important to avoid using too much heat in an effort to speed things along--this will char the fiber center washer or make it brittle. Use just enough heat to melt the pitch. Once you have removed the sockets, use a soldering iron to remove the remaining wire stubs from the sockets and they are then ready for reuse. This is also a useful way to recover perfectly good C7 and C9 sockets from old cloth cords that have deteriorated to the point where they are no longer safe to use. The salvaged sockets can then be used to repair or replace damaged sockets on good sets. MY OLD COMPOSITION-TYPE SOCKET SETS ARE IN BAD SHAPE. IS THERE ANY WAY TO RE-WIRE THESE? THERE SEEMS TO BE NO WAY AT ALL TO GET THEM APART. Sadly, most of the really old composition lighting strings were made to stay together, and there is not a simple way to get these apart for repair. All is not lost, however, as Chris Cuff, a frequent contributor to this site and a good friend, has come up with a creative way to fix this type of light string. You'll need a Dremel Moto-Tool with a cutoff wheel, a soldering iron and some good epoxy glue. Here are the steps Chris uses to fix the socket sets:
WHAT ABOUT REPAIRING BAD SPOTS OR SPLICES IN THE CLOTH-COVERED WIRE ITSELF? IS IT POSSIBLE TO MAKE AN INVISIBLE REPAIR? The answer to this question is that while an invisible repair is not possible, you can come pretty darn close! I've illustrated the procedure in the chart below:
IS THE NOMA COMPANY STILL IN BUSINESS? WHERE CAN I CONTACT THEM? The NOMA company has been bought and sold many, many times over the years, and is not the huge company it once was. The current trademark holder is the Inliten Company, who markets several modern lighting outfits under the NOMA name. They are unable to offer replacement parts or much information about the older products of the 1940s and 1950s, but they can be contacted at: www.inliten.com IS IT POSSIBLE TO GET MY
BURNT OUT BUBBLE LIGHTS TO SHINE AGAIN? HOW? Yes, it is
certainly
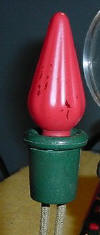
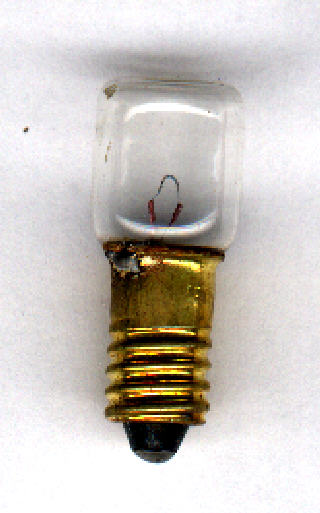
possible to repair your burnt out bubble lights! First, Please do remember that there are MANY different types of bubble lamps out there, and that the information provided here should be adapted to your particular model. We'll discuss several types, beginning with the most popular-the NOMA miniature-base series type Biscuit. To begin, have on hand a supply of the proper replacement lamps, along with a sharp razor-type knife (X-Acto or something similar), a sharp pencil, household pliers, some common modeler's glue (I use Testor's), a small tube of 100% silicone caulking or sealant, a few small rubber bands, a nine volt battery and a bowl of hot (but NOT boiling) tap water. An old washcloth will come in handy as well. We'll attack the NOMA biscuit first, remembering that with a little creativity, these procedures are applicable to most of the other cemented-together type bubble bases as well. The first requirement is to remove the bubble tube from the unit. Sometimes, it will already be loose, or else a very gentle rocking back and forth will loosen it. Failing this, grab that bowl of water and put your bubble light in it for about ten minutes or so. Don't worry, it will not harm anything, and in fact you'll probably get to see the bubble tube boil merrily away just from the heat of the water! The heat and water will soften the glue that is used the seal the tube and lamp together. When you remove the unit from the water, you'll find that the tube will exit the base with little effort. While the glue is still soft, clean the tube gently with the wash cloth to remove all traces of adhesive, and clean out the hole in the base of the "shell" as well. Now for the worst part-separating the two halves of the bubble light shell. This shell is of course plastic, cellulose acetate to be exact. Being quite soft, applying pressure to the joint between the two halves with an X-Acto knife will not produce satisfactory results. The halves will come apart, but with a ragged, uneven edge that will be quite unsightly. To work around this problem, put the shell in your freezer for 15 minutes! Freezing will harden the soft plastic, and you'll most often get a nice, clean break. To accomplish this, remove the shell from the freezer and immediately put the sharp point of your knife into the seam between the two halves. A gentle twist of the knife will result in a sharp crack, and the halves will have separated cleanly. Sometimes you'll find it necessary to finish the job by hand, gently pulling the halves completely apart. The key here is to do the separating while the shells are still frozen. The worst part is over! Now, remove the old light bulb from the bottom half of the shell. Sometimes it will be loose, and a gentle push from the bottom pops the lamp out. Other times, you'll find that the factory has melted the lamp into the base, and it will not easily come out. A gentle twist with a pair of pliers will loosen it, and pressure applied to the lamp by putting the base on the washcloth and quickly pushing down on the shell will remove the little devil quite nicely. Insert your new lamp, being sure to align the little blob of solder on the side of the threads with the cut out in the base made to let the lamp seat fully. Seal the lamp in place with a small bead of silicone caulking or sealant, being certain not to block any ventilation holes in the bottom of the shell. allow the unit to cure for several hours while you work on other bubblers. At this point, it will be wise to test the lamp for proper operation with a nine volt battery. Touch the bottom tip of the light to one terminal of the battery, then lean it over so that the brass threaded portion will touch the other contact of the battery. If all is well, you'll be rewarded with a cheerful glow from your new lamp! Now, cement the two halves of your shell together. Dry fit the parts together first, and take note of their proper position so that you'll have a nice, tight seal. If you're afraid that you'll loose your place, a small line drawn in pencil on each half will help align the parts. With the Testor's cement, put a very thin bead of glue onto the edge of one of the halves, avoiding any cement overrun onto the outside of the shell. This glue actually dissolves a bit of the plastic, so any glue on the outside will leave an ugly smear which will mar the plastic forever. Press the two halves together, and hold them firmly for two or three minutes. A rubber band will also be useful in holding parts together so you can go get a cup of coffee. It is vitally important that the two halves be cemented firmly together with their proper original alignment to prevent nasty little light leaks around the seam when in operation. Now for the bubble tube. Since you cleaned it properly earlier on in this project, the tube is ready to go and will slide into the hole in the top shell easily. Put a bit of silicone sealant on the bottom of the tube and around the inside edge of the receiving hole, and then press it firmly into place. You'll want to be sure that the bottom of the tube and the top of the bulb are firmly seated and sealed together, so that the lamp can provide the proper heat to let the unit bubble. Allow the entire unit to cure for 24 hours, and then you can bask in the glow of your newly restored treasure from Christmas past. ALTERNATE METHOD: Lee Lowry recently shared with me an alternate method of biscuit-style bubble light repair that is both creative and effective. Using several turns of a strong bare wire, Lee fixes an X-Acto blade onto the end of a 40 watt soldering iron. After heating the iron and blade, the bubble light is turned upside down, and careful slices are made between the vent holes on the bottom, effectively "connecting the dots" with 45 degree angle cuts. It's important to try to keep the cuts at a good 45 degrees, so that the piece will not fall into the base, and you will have a broad edge to re-glue in the last step of the repair process. Remember how you cut off the top of a pumpkin at Halloween? That's the same way we want to cut here, so the lamp assembly will not be able to fall through. When all the cuts are completed, remove the resulting hex-shaped section with the lamp. Pop out the lamp, replace it, and glue the assembly back in place. Super Glue or common modeler's glue is fine, and be sure not to fill the ventilation holes! Lee reports that when this procedure is properly followed, the result is quite satisfying, with all of the work on the bottom of the bubble light where it is not easily noticeable. There's more on re-lamping other types of bubblers on the next page! Frequently Asked Questions, continues... TABLE OF CONTENTS HISTORY THE TIMELINE MANUFACTURER'S HISTORIES THE PATENT PAGES THE PRE-ELECTRIC ERA VINTAGE ADVERTISING THE LIGHT SET GALLERIES RELATED LINKS |
||||||||||||||||||||||||||||
|
Note: OldChristmasTreeLights™ and FamilyChristmasOnline™ are trademarks of Breakthrough Communications™ (www.btcomm.com).
|

 | ||||||
| Visit our affiliated sites: | ||||||
| - Christmas Memories and Collectibles - | ||||||
 |

|

|
 |

|
||
| - Family Activities and Crafts - | ||||||
 |

|

|

|

|

|
|
| - Music - | ||||||

|

|
 |

|

|

|
|
| - Trains and Hobbies - | ||||||
 |
 |
 |
 |
 |  |
|

|

|

|  |
|

|
|